


You are using an out of date browser. It may not display this or other websites correctly.
You should upgrade or use an alternative browser.
You should upgrade or use an alternative browser.
Wild Yeast Sourdough Starters Exchange
- Thread starter janiejoey
- Start date
syzygy314
Cathlete
I'm a total newbie to this so I wouldn't have a clue if grapefruit juice would work! I guess the only way to find out is to try it! Good luck with your starter! I hope you are successful on your first run!
I am in Florida and was actually thinking about the possibility of using grapefruit juice instead of pineapple juice for the acidic liquid.
But right now, I have started with pineapple and organic wholewheat flour and I am really excited!! There are already bubble beginnings. I'll keep you posted!
Beth
Hi Janie, Tricia, Suzanne and welcome Beth!
All the bread is gone and so is the tapenade.
I divided my culture this morning and fed it. It is bubbly and smells just right. Tomorrow I'll spread out the culture to dry. I also started 8 more loaves of bread.
Tricia - I went through several 5 pound bags of flour while activating my culture. Then I graduated to a 50 pound bag of Guisto's High Performer. This morning I scraped the bottom of the bag! Keep in mind I make a lot of pizza too. As for the conversion chart....this bread baking round I started weighing my ingredients. Not only was it a lot faster, I felt more confident that I was getting the correct measurement. Do you have a kitchen scale? I weighed it in grams.
Suzanne - I bought 500 pounds, or 50 cubic yards of compost today! Time to refresh those beds. I also started my cuke and zuke seeds. I hope to get out there tomorrow to plant green beans and sugar peas. I am growing my peppers in the green house this year. They loved the radiant heat from the wall of the house last year, I think this year, with the evening warmth of the greenhouse, I'll set fruit earlier. How'd your culture do today? Most recipes I have seen only ask for 1/4 to 1/3 cup of culture to start a mother. Even so, you can just add flour and water in equal proportions and wait a day.
Janie - I vow to spell your name correctly from this day forward. I think your user name throws me off and I make a hybrid of you and your husband's name. What you cut, pasted and posted from Wikipedia was very interesting and useful. I'll have to look back at the other resources and links you have posted, I have been enjoying the Fresh Loaf site too. http://www.thefreshloaf.com/
Beth - love your user name! Yes, grapefruit juice will work fabulously. Great idea! I am so glad you joined our merry group of bakers.
I can't wait to try everyone's cultures, plus I still have the Oregon Trail starter to try.
The first book I used, Ed Wood's Classic Sourdough, was another book that gave me conflicting vocabulary and confusing information. Loving loving loving Reinhert. He just taught a class at Ramekins in Sonoma. I had an opportunity to go - gosh darn it - now I am kicking myself that I didn't.
I'll try to remember to take pix of my culture drying - where to put the parchment sheets???? I really do need to figure that out.
All the bread is gone and so is the tapenade.
I divided my culture this morning and fed it. It is bubbly and smells just right. Tomorrow I'll spread out the culture to dry. I also started 8 more loaves of bread.
Tricia - I went through several 5 pound bags of flour while activating my culture. Then I graduated to a 50 pound bag of Guisto's High Performer. This morning I scraped the bottom of the bag! Keep in mind I make a lot of pizza too. As for the conversion chart....this bread baking round I started weighing my ingredients. Not only was it a lot faster, I felt more confident that I was getting the correct measurement. Do you have a kitchen scale? I weighed it in grams.
Suzanne - I bought 500 pounds, or 50 cubic yards of compost today! Time to refresh those beds. I also started my cuke and zuke seeds. I hope to get out there tomorrow to plant green beans and sugar peas. I am growing my peppers in the green house this year. They loved the radiant heat from the wall of the house last year, I think this year, with the evening warmth of the greenhouse, I'll set fruit earlier. How'd your culture do today? Most recipes I have seen only ask for 1/4 to 1/3 cup of culture to start a mother. Even so, you can just add flour and water in equal proportions and wait a day.
Janie - I vow to spell your name correctly from this day forward. I think your user name throws me off and I make a hybrid of you and your husband's name.
What you cut, pasted and posted from Wikipedia was very interesting and useful. I'll have to look back at the other resources and links you have posted, I have been enjoying the Fresh Loaf site too. http://www.thefreshloaf.com/Beth - love your user name! Yes, grapefruit juice will work fabulously. Great idea! I am so glad you joined our merry group of bakers.
I can't wait to try everyone's cultures, plus I still have the Oregon Trail starter to try.
The first book I used, Ed Wood's Classic Sourdough, was another book that gave me conflicting vocabulary and confusing information. Loving loving loving Reinhert. He just taught a class at Ramekins in Sonoma. I had an opportunity to go - gosh darn it - now I am kicking myself that I didn't.
I'll try to remember to take pix of my culture drying - where to put the parchment sheets???? I really do need to figure that out.
janiejoey
Cathlete
A lot of activity here lately. Let me try to catch up.
Tricia, You are getting the idea. There are so many places to look for info and all of us needs to take them apart and keep the info that we want from each. LOL
I think all over the world, (if possible) would be great to have different starters.
Suzanne, If there are bubbles, you are doing good. Not all cultures will be a havoc of bubbles. Just depends on your area. The important thing is, it will make bread!. And it will. Sometimes when it is a little cook, it does take a little longer.
My whole grain book should be in the mail today. Can't wait to look at all the different whole grain breads to bake.
I know it is a lot to take in all at once, but it's OK. You are going to bake wonderful sourdough bread.
Welcome Iron-mom! I think I'll start another culture after this with pineapple. Sounds like it is a winner and maybe a little easier. Thank you for the inspiration. You have bubbles already? Good going!
I think grapefruit juice would work. I'd be interested in how that goes.
Janis, Was there any doubt that there wouldn't be any bread left over?LOL
Thanks for the link, I'll be all over it in a few minutes.
Sounds like we may have a starter from you in several day! I can't wait! May I also have a loaf of bread as well? Enjoy those breads, I know your family will.
I didn't see my name misspelled. Even if it was, no biggy. LOL
You are going to love the Oregon Trail starter. It's amazing!
Have fun everyone and enjoy the process.
Janie
Tricia, You are getting the idea. There are so many places to look for info and all of us needs to take them apart and keep the info that we want from each. LOL
I think all over the world, (if possible) would be great to have different starters.
Suzanne, If there are bubbles, you are doing good. Not all cultures will be a havoc of bubbles. Just depends on your area. The important thing is, it will make bread!. And it will.
Sometimes when it is a little cook, it does take a little longer.My whole grain book should be in the mail today. Can't wait to look at all the different whole grain breads to bake.
I know it is a lot to take in all at once, but it's OK. You are going to bake wonderful sourdough bread.
Welcome Iron-mom! I think I'll start another culture after this with pineapple. Sounds like it is a winner and maybe a little easier. Thank you for the inspiration.
You have bubbles already? Good going!I think grapefruit juice would work. I'd be interested in how that goes.
Janis, Was there any doubt that there wouldn't be any bread left over?
LOL Thanks for the link, I'll be all over it in a few minutes.
Sounds like we may have a starter from you in several day! I can't wait! May I also have a loaf of bread as well?
Enjoy those breads, I know your family will.I didn't see my name misspelled. Even if it was, no biggy. LOL
You are going to love the Oregon Trail starter. It's amazing!
Have fun everyone and enjoy the process.
Janie
Day 2
Starter has lost the bubbles and looks kind of shiny. The directions said to leave it alone today, so I guess I won't worry until tomorrow. In the meantime, I decided to make a loaf of whole wheat by hand, well with a mixer, just not my bread machine.. I used to make bread everyday for my kids until I lost the paddle to the machine and went on a low carb diet
What ever is happening, this is exciting!! Thanks for your inspiration and, I have to admit, someone (Janis?) posted those pictures of your bread and I started drooling!! Janis, you must be feeding alot of people!
I am continuing to read off your links, and I will keep you informed!
syzygy314
Cathlete
Janis - Wow! That's a lot of flour! I envy you your garden! Someday I would love to grow my own veggies and herbs!
Suzanne, Beth and Janie - Hello! Everyone seems to be doing so well! It's just way more excitement than I'm used to around here! LOL! Says a lot about my social life, doesn't it?
Anyway, here's my situation and one more question! Are you surprised?
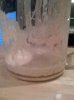
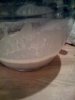
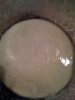
My whole wheat starter felt a bit spongy today! I think that's good. My white flour one is pretty runny. I took some photos with my phone to post here and I know they're not great, but maybe you can take a look and give me some input as to whether they look right or not? If you can see anything at all. I had a heck of a time getting them!
Now, for the question. If I'm taking and using only a 1/4 cup of my starter and ditching the rest each day, then making my addition of flour and water, how is it supposed to rise and double? I'm using the instructions on The Fresh Loaf with the pineapple juice. Oh, one more - also, how is this going to make enough for me to send samples to everyone and still try making a loaf or two of bread?
Okay, that's it for tonight! Thanks for your input and advice!
Now, how do I attach photos again . . .oh!, there it is.
Okay, there's going to be a page 2 for the rest of the pics. Didn't put in all the right ones and can't get rid of the bad ones. Sorry! I so suck at this tech stuff!
Suzanne, Beth and Janie - Hello! Everyone seems to be doing so well! It's just way more excitement than I'm used to around here! LOL! Says a lot about my social life, doesn't it?
Anyway, here's my situation and one more question! Are you surprised?
My whole wheat starter felt a bit spongy today! I think that's good. My white flour one is pretty runny. I took some photos with my phone to post here and I know they're not great, but maybe you can take a look and give me some input as to whether they look right or not? If you can see anything at all. I had a heck of a time getting them!
Now, for the question. If I'm taking and using only a 1/4 cup of my starter and ditching the rest each day, then making my addition of flour and water, how is it supposed to rise and double? I'm using the instructions on The Fresh Loaf with the pineapple juice. Oh, one more - also, how is this going to make enough for me to send samples to everyone and still try making a loaf or two of bread?
Okay, that's it for tonight! Thanks for your input and advice!
Now, how do I attach photos again . . .oh!, there it is.
Okay, there's going to be a page 2 for the rest of the pics. Didn't put in all the right ones and can't get rid of the bad ones. Sorry! I so suck at this tech stuff!
Attachments


Tricia - I have not made a wild culture yet, but from what I can tell your culture looks like it should. Janie, the wild one, will know for sure.
As for having enough culture to share and bake with, once your culture is ready, each time you feed it instead of discarding the amount that is greater than a quarter cup, put the excess in another (clean) jar and feed it also.
Beth - The photos are Janie's bread! I haven't gotten around to posting any of mine. I have 3 sons plus my dh. When they came home from school today (the 20 and 18 year old) the first thing they said was - "did you bake any bread today?" When I said "no, sourdough takes time", the gave me all sorts of razzing. Kind of sweet, really. They'll have bread tomorrow though. THEY offered to buy the ingredients for more tapenade. Cool.
Ciao bakers.
Last edited:
syzygy314
Cathlete
Janis - How wonderful to have such enthusiasm for your baking! My DH will eat anything, so he doesn't really get very excited about anything I cook or bake! I always have to ask how it is. Of course, as soon as I tell him I'm not cooking, THEN he gets excited in a scared sort of way! LOL!
Thanks for the help! I'll do that for tomorrow's feeding!
Thanks for the help! I'll do that for tomorrow's feeding!
story1267
Cathlete
Must run out the door in a minute but I just wanted to say I did put my mother starter together today. It has a nice, lively feel to it if that makes any sense.
Plus I kept back some of the extra and fed it and I'm hoping to use that to send out.
Janie - I love your "havoc of bubbles". An excellent term. It made me smile and, believe me, I can use it this week!
Plus I kept back some of the extra and fed it and I'm hoping to use that to send out.
Janie - I love your "havoc of bubbles". An excellent term. It made me smile and, believe me, I can use it this week!
syzygy314
Cathlete
Hi Ladies!
Taking some info on what bread book to get first. Suzanne recommended Peter Reinhardt's Whole Grain Breads. Any other recommendations out there? I'm going to be needing one soon! I have looked at some of the recipes on the websites you all have given. If you have any recs on which recipes there would be easy enough for a beginner, I'll take those as well!
Thanks for you input!
janiejoey
Cathlete
Suzanne, How's your mother starter doing? I'm so impressed. Hope things are good for ya.
Tricia, Along with the ones you mentioned, there also are: Any of Jeff Hertzberg, Bread Alone by Daniel Leader & Judith Blahnik, Nancy Silverton's Breads from the LA Brea Bakery by Ruth Reichl, The Bread Book by Betsy Oppenneer. All good, take your pick and enjoy.
Janie
Tricia, Along with the ones you mentioned, there also are: Any of Jeff Hertzberg, Bread Alone by Daniel Leader & Judith Blahnik, Nancy Silverton's Breads from the LA Brea Bakery by Ruth Reichl, The Bread Book by Betsy Oppenneer. All good, take your pick and enjoy.
Janie
Last edited:
syzygy314
Cathlete
Thanks Janie!
Wow! I'm going to have a heck of a list on Amazon! Tee, hee! BTW, I had to move my starters out of the microwave this morning so I could zap my oatmeal (it's not the instant - just had to say) and my starters were looking really perky! At least, to me in comparison with all the pictures I've seen online so far! I'm getting excited! They're starting to look like they're going to do something soon! Woo-hoo! I now have 4 containers since I took Janis' advice and, instead of throwing out the excess, I created 2 new starters so I'd have enough going to produce for everyone!
Now, should I keep discarding or can I just keep feeding the starters without discarding any?
Tricia, Along with the ones you mentioned, there also is: Any of Jeff Hertzberg, Bread Alonge by Daniel Leader & Judith Blahnik, Nancy Silverton's Breads from the LA Brea Bakery by Ruth Reichl, The Bread Book by Betsy Oppenneer. All good, take your pick and enjoy.
Janie
HI Everyone,
My starter is taking it's sweet time to dry out. I think it might be another day or two before it is ready to crumble and send to everyone.
Beth - if you would like a sample of Northern California starter - it is from San Francisco Sourdough starter from Sourdough International (Ed Wood's site), but by now, I believe, it has acclimated to my area after months of feeding - please PM your address.
Tricia -I think for now just stick with Reinhert's books, I am using, Artisan Bread Every Day. I found his writing, his techniques and his recipes to be approachable and easy to understand.
I am eating way to much bread! And suffering the puffy consequences.
My starter is taking it's sweet time to dry out. I think it might be another day or two before it is ready to crumble and send to everyone.
Beth - if you would like a sample of Northern California starter - it is from San Francisco Sourdough starter from Sourdough International (Ed Wood's site), but by now, I believe, it has acclimated to my area after months of feeding - please PM your address.
Tricia -I think for now just stick with Reinhert's books, I am using, Artisan Bread Every Day. I found his writing, his techniques and his recipes to be approachable and easy to understand.
I am eating way to much bread!
And suffering the puffy consequences. janiejoey
Cathlete
Tricia, LOL, you are too funny. You need to discard because what has happened is the bacteria (after 24 hrs.) has nothing left to feed on, because (bless their little hearts) they procreate and have many babies during that time. There isn't enough food for everyone and some must go. When you discard and use fresh flour and water in its place, you are giving them another 24 hrs. of food and enough space to bread all over again. So for now, (at least until you start to make bread) this is what you'll need to do.
I agree with Janis, Peter Reinhart does explain very well. You can't go wrong with that book.
Janis, I went to Peter's blog and found this. I hope it helps. It's all about how to dry your starter and reviving it. However, your starter still can be thicker than what he has and still will work, it just will take a little longer before it can completely dry. It really needs to be bone dry before you package it up or it could get moldy.
I know the puffy consequences of eating bread. I have the same problem.
Drying a Starter
May 6 2009 at 09:43 pm
If you’re moving across the country and want to take your sourdough starter with you, or want to mail some to a friend, or want to save a backup of a particularly well-loved starter as insurance against accidental loss, drying your starter can be the way to go.
Drying a liquid starter is simple and fast, and reviving it to baking strength takes less time, and is easier, than starting a new one from scratch.
Before drying your starter, make sure it is strong and vibrant. If you normally refrigerate it, take it out and feed it for a few days, as you would before using it in a dough.
When it is good and strong, feed it a final time, then ferment it for about half the time you would normally go until the next feeding. You want the yeast to have something left to feed on while they are falling asleep.
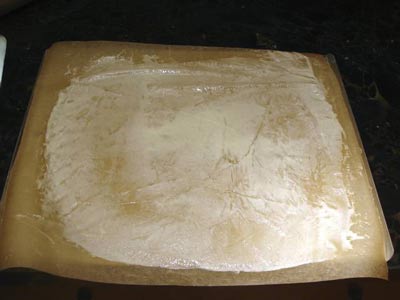
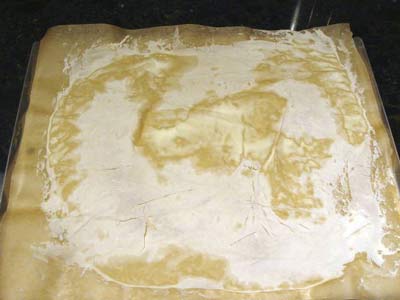
Then, using an offset spatula, spread a thin layer of starter on a piece of parchment, put it somewhere where it will be free from flying debris, and wait for it to dry completely. This will take approximately overnight, but the exact time will vary according to the hydration of your starter, how thickly your smear it, and the temperature and humidity in your house. Make sure it is completely bone dry, or you run the risk of mold.
Here’s how mine looked just after spreading it out to dry:
 Here’s how it looked after drying for 2 hours:
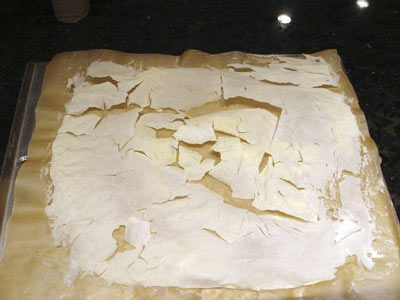
 And here it is, completely dry after 12 hours:
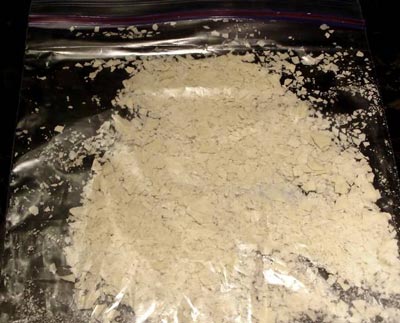
 Now just put the pieces in a sealed bag and use a rolling pin to crush them to the approximate size of fish food flakes, or smaller, like this:
 Store it in the refrigerator until you need it. I’m not sure how long it will keep, but I have successfully resuscitated one that had been chilling out for at least a year.
To revive the starter, the general idea is that you just start feeding it with flour and water, in the same ratio as the original. Here’s the schedule I used; your mileage may vary:
To 3/4 teaspoon (about 2.5 g) of dried starter, add 20 g water; soak for 10 minutes.
Add 20 g flour; cover and ferment for 24 hours, until there are small bubbles indicating life. (The bubbles will be within and not necessarily on the surface; using a clear glass or plastic container helps you see them.)
Without discarding any of the above, add another 20 g flour and 20 g water; ferment for 12 hours and see bubbles on the surface.
Discard all but 15 g of the starter, and add 30 g water and 30 g flour. Ferment 12 hours.
Discard all but 15 g of the starter, and add 30 g water and 30 g flour. Ferment 12 hours.
Discard all but 10 g of the starter, and add 40 g water and 40 g flour. Ferment 12 hours.
At this point, at 72 hours, my starter was active and ready to use.
Hope everyone's day is good,
Janie
You need to discard because what has happened is the bacteria (after 24 hrs.) has nothing left to feed on, because (bless their little hearts) they procreate and have many babies during that time. There isn't enough food for everyone and some must go. When you discard and use fresh flour and water in its place, you are giving them another 24 hrs. of food and enough space to bread all over again. So for now, (at least until you start to make bread) this is what you'll need to do.I agree with Janis, Peter Reinhart does explain very well. You can't go wrong with that book.
Janis, I went to Peter's blog and found this. I hope it helps. It's all about how to dry your starter and reviving it. However, your starter still can be thicker than what he has and still will work, it just will take a little longer before it can completely dry. It really needs to be bone dry before you package it up or it could get moldy.
I know the puffy consequences of eating bread.
I have the same problem.Drying a Starter
May 6 2009 at 09:43 pm
If you’re moving across the country and want to take your sourdough starter with you, or want to mail some to a friend, or want to save a backup of a particularly well-loved starter as insurance against accidental loss, drying your starter can be the way to go.
Drying a liquid starter is simple and fast, and reviving it to baking strength takes less time, and is easier, than starting a new one from scratch.
Before drying your starter, make sure it is strong and vibrant. If you normally refrigerate it, take it out and feed it for a few days, as you would before using it in a dough.
When it is good and strong, feed it a final time, then ferment it for about half the time you would normally go until the next feeding. You want the yeast to have something left to feed on while they are falling asleep.
Then, using an offset spatula, spread a thin layer of starter on a piece of parchment, put it somewhere where it will be free from flying debris, and wait for it to dry completely. This will take approximately overnight, but the exact time will vary according to the hydration of your starter, how thickly your smear it, and the temperature and humidity in your house. Make sure it is completely bone dry, or you run the risk of mold.
Here’s how mine looked just after spreading it out to dry:
To revive the starter, the general idea is that you just start feeding it with flour and water, in the same ratio as the original. Here’s the schedule I used; your mileage may vary:
To 3/4 teaspoon (about 2.5 g) of dried starter, add 20 g water; soak for 10 minutes.
Add 20 g flour; cover and ferment for 24 hours, until there are small bubbles indicating life. (The bubbles will be within and not necessarily on the surface; using a clear glass or plastic container helps you see them.)
Without discarding any of the above, add another 20 g flour and 20 g water; ferment for 12 hours and see bubbles on the surface.
Discard all but 15 g of the starter, and add 30 g water and 30 g flour. Ferment 12 hours.
Discard all but 15 g of the starter, and add 30 g water and 30 g flour. Ferment 12 hours.
Discard all but 10 g of the starter, and add 40 g water and 40 g flour. Ferment 12 hours.
At this point, at 72 hours, my starter was active and ready to use.
Hope everyone's day is good,
Janie
syzygy314
Cathlete
Janis - Thanks! I've been reading a lot of reviews on Amazon and I think that's the way I'm going to go! (Reinhart)
Janie Thanks, Janie! I'll do that tonight with all 4 of them. I just want to be sure I have enough because every time I discard, I end up with the same amount as I started with. (???) Isn't it supposed to be exploding? Yesterday was Day 7. I'm going to swing by the store and try to find some Mason jars as I'm currently using my kitchen bowls and I'll be needing those! If successful, I'll transfer them tonight.
So, how long should it take before I have a usable/driable starter anyway?
Hello to Suzanne and Beth! Hope you're having great success!
janiejoey
Cathlete
Tricia, Are you following the Reinhart instructions on a starter? If not here are the instructions. After 5 days I would continue with this process, for a total of 14 days. This makes a nice sour starter and ready to dry and ship out to friends.
Flour + Water = Starter | Wild Yeast
If not, I use these instructions, and again after the 5th day continue discarding and feeding up to 14 days. Or continue on what you are doing for up to 14 days. Your starter should by now at least double in size. Then dry it and send the wonderful beasties to us! LOL
MAKING YOUR OWN SOURDOUGH STARTER
You can try your hand at making your own sourdough starter. You will need a clean 32-48 oz non-metallic container, pineapple juice or apple cider, good water and flour. To optimize your chances of activating a vigorous starter, use either part whole grain flour or some rye flour in your mixture. Whole grains have 200 times the amount of organisms as white flours*.
After the mixture has started to ferment, begin to feed the mixture water and white flour (either All Purpose or Bread flour), if you desire a white sourdough starter. Or keep feeding the mixture with whole grain flours to have a wholegrain starter.
The above method will help you avoid some of the pitfalls of just adding water and flour together and then feeding each day - hoping for the best. However, you can try the plain flour and water mixture and see what results are produced. Some really great starters are obtained this way.
Some of the things that can cause problems when trying to culture a new starter are:
After your starter is established and mature, which takes about two weeks, you can feed it any hydration you please. Two common hydration feedings are the 166% and the 100% hydration.
For 166% hydration, you feed your starter using a ratio of volume of 1:1. This means for instance, one cup of water to one cup of flour or half cup of water to half cup of flour.
For 100% hydration you feed your starter using a ratio of weight 1:1. This can be maybe 6 oz water to 6 oz flour or perhaps 4 oz of water to 4 oz of flour.
Some of the things that can cause problems when trying to culture a new starter are:
Janie
Flour + Water = Starter | Wild Yeast
If not, I use these instructions, and again after the 5th day continue discarding and feeding up to 14 days. Or continue on what you are doing for up to 14 days. Your starter should by now at least double in size. Then dry it and send the wonderful beasties to us! LOL
MAKING YOUR OWN SOURDOUGH STARTER
You can try your hand at making your own sourdough starter. You will need a clean 32-48 oz non-metallic container, pineapple juice or apple cider, good water and flour. To optimize your chances of activating a vigorous starter, use either part whole grain flour or some rye flour in your mixture. Whole grains have 200 times the amount of organisms as white flours*.
After the mixture has started to ferment, begin to feed the mixture water and white flour (either All Purpose or Bread flour), if you desire a white sourdough starter. Or keep feeding the mixture with whole grain flours to have a wholegrain starter.
- You might try something like this,
Day One: Add: " ¼ cup organic rye flour " ¼ cup bread flour " ½ cup pineapple or apple cider (you can use pure water, but it takes a few days longer to get going) Stir well to incorporate plenty of oxygen and let the container of the flour/juice mixture set, lightly covered, at room temperature. There is a tendency in those just starting out in sourdough baking to keep their starters and doughs at very warm temperatures to hurry things up. This is not always desirable, especially for a sourdough starter. Try to keep the new starter in a place that is between 68-80F (20-26C) degrees. A higher temperature encourages undesirable bacteria in a new starter that isn't yet stable enough to fend off invaders. Organic flours produced without chemicals are more likely to get a good sourdough starter going. The pineapple or apple cider is used for the acid conditions they provide which encourage the desired bacteria and yeasts and discourage the undesired bacteria/yeasts. This was researched by Debra Wink and written about in her article "The Pineapple Juice Solution". This article is available at BBGA.org for registered members. This starter procedure was developed in collaboration with Debra Wink and I am grateful for her expertise. - Day Two: Stir, nothing else is needed on day two.
- Day Three:
Whether you see bubbles or not, pour out half of your starter mixture and feed the starter with:
" ½ cup of pineapple juice or apple cider (or water)
" ¼ cup of rye or whole wheat flour
" ¼ cup of bread flour
Pouring out half of the starter will give any yeasts or bacteria that are present, a larger ratio of food and will dilute of any undesirable bacteria. - Day Four: Follow the same feeding as in Day Three.
- Day Five through day Fourteen: Now each day for the next ten days, pour off half of your starter mixture and feed with 1/2 cup water (juice is no longer necessary after day four) and 1/2 cup flour mix. If you wish to have a white flour starter, now is the time to begin feeding the starter white flour instead of rye or whole wheat flours (using more white flour at each feeding and less wholegrain flour is easier on the starter, as you are switching flours, after a couple of days, use only white flour).
The above method will help you avoid some of the pitfalls of just adding water and flour together and then feeding each day - hoping for the best. However, you can try the plain flour and water mixture and see what results are produced. Some really great starters are obtained this way.
Some of the things that can cause problems when trying to culture a new starter are:
After your starter is established and mature, which takes about two weeks, you can feed it any hydration you please. Two common hydration feedings are the 166% and the 100% hydration.
For 166% hydration, you feed your starter using a ratio of volume of 1:1. This means for instance, one cup of water to one cup of flour or half cup of water to half cup of flour.
For 100% hydration you feed your starter using a ratio of weight 1:1. This can be maybe 6 oz water to 6 oz flour or perhaps 4 oz of water to 4 oz of flour.
Some of the things that can cause problems when trying to culture a new starter are:
- Old Flour - obtain high quality, unbleached flours which are not too old or rancid, preferably organic.
- Water - the chemicals in city water can be a problem for starters, use fresh, filtered water or good well water.
- Time and Temperature - be patient; do not try to hurry the process by keeping the starter in a very warm place (over 80 F) because a culture which is too warm can encourage bad bacteria to take over.
Janie
story1267
Cathlete
Hmmmm. Though it has been many hours the Mother Starter...she does not double. She expanded a bit...but did not double..... I will just forge ahead anyway. I need to make the Soaker and the whole shebang is going into the fridge per directions anyway until I can wrap my head around it.
Janis - your garden sounds wonderful! Last year we started late and really just practically tossed some seeds in the ground and hoped for the best! We did quite well except for the tomato blight - but I think a lot of folks had tomato trouble last year.
Janie - thanks for your illustrated instructions on drying and reconstituting starter. I hope my starter has some life in it.....but it's all experimentation so, if it has croaked, I'll just start another!
Tricia - I hear what you're saying about containers! I finally appropriated a glass 2 cup measure for my seed culture and a different tupperware measuring bowl for my mother starter so that I could actually measure if anything was happening!
ETA: Janie, I had a moment to sit and read what you posted about starters and that they take two weeks to really get rolling. That makes sense, and also makes me feel a little better. I think I will go ahead though and attempt a loaf with what I have. Even if it comes out a whole wheat brick I will have at least gone through the process. DH thinks it's a lot of work - he sees me stirring, brow furrowed, but really, it's just a learning curve.
Janis - your garden sounds wonderful! Last year we started late and really just practically tossed some seeds in the ground and hoped for the best!
We did quite well except for the tomato blight - but I think a lot of folks had tomato trouble last year.Janie - thanks for your illustrated instructions on drying and reconstituting starter. I hope my starter has some life in it.....but it's all experimentation so, if it has croaked, I'll just start another!
Tricia - I hear what you're saying about containers! I finally appropriated a glass 2 cup measure for my seed culture and a different tupperware measuring bowl for my mother starter so that I could actually measure if anything was happening!
ETA: Janie, I had a moment to sit and read what you posted about starters and that they take two weeks to really get rolling. That makes sense, and also makes me feel a little better. I think I will go ahead though and attempt a loaf with what I have. Even if it comes out a whole wheat brick I will have at least gone through the process. DH thinks it's a lot of work - he sees me stirring, brow furrowed, but really, it's just a learning curve.
Last edited: